Can I DIY The Installation Of My Solar Inverter?
If you are comfortable climbing on your rooftop and can wire a household electric socket, you can DIY the installation of your solar inverter.
DIY installation will save you a thousand dollars when installing an inverter and cut down years of payback time. So, get a hand to complete the solar inverter project within 1-3 weekends. But you can also appoint professional installers to assist with the specific part over the projects. So here we provide a step-by-step guide to DIY solar inverter installation by highlighting expert advice and tips to help you install your solar energy system confidently. So, let's dive in!
Step-by-Step Guide for DIY Solar Inverter Installation
DIY Solar Inverter Post-Installation Steps
Before installing solar inverters and panels in your home, ask yourself the following questions.
- What are the most suitable solar panels for my home?
- How many solar panels do I need to meet my power needs?
- What kind of battery do I require for my DIY installation project?
Once you have decided to install your solar system, follow the following steps.
Step 1: Determine Your Energy Need
The first step in installing the solar inverter is considering your energy requirements. You will need to determine how much electricity you use on a typical day and the size of the solar panel system required to fulfill your energy requirements.
You can get this information by reviewing your electricity bills and average daily energy consumption.
Step 2: Asses Your Property and Choose the Right Location and Panel Size
Once you know your energy needs, the next step is to pick the right location for your solar panel. The selected area should receive direct sunlight for a significant portion of the day and should be free of obstacles that can block the sun's rays.
You will also need to determine the orientation and title of the panels as it can impact energy generation. Calculate your yearly power generation in kWh by multiplying the total solar panel wattage by 1.2.
For instance, a DIY solar system with eight 100 modules would have 800 W of total power and produce around 960 kWh annually.
Step 3: Clean the Site and Obtain Permissions
Prepare your site once you have chosen the right location and solar system size. This involves cleaning the area and monitoring for plumbing or electric systems that could be in the way. Further, ensure the site is balanced and level to remove any hurdle.
Permission is also the biggest hurdle for many DIY solar installations. So, if your solar panel is permanently fixed over the roof, you will need building permissions and an interconnection permit if you desire a grid-tied system. Utility providers will only let hookups happen once your solar panels are expertly installed.
DIY Solar Inverter Installation Steps
Now you have chosen the location and finest solar panel for your home, it's time to DIY solar inverter;
Step 4: Install the Mounting System
The mounting system is the structure that holds the solar panel in place. You must install it on the ground or rooftop and attach the solar panels according to your chosen area.
Step 5: Connect the Panels with the Solar Inverter
Inverters convert the direct current electricity generated by the solar panels into alternating current electricity. You can then use this alternative current to meet your residential and industrial electricity needs. Connect the solar panels to the inverter, deploying the appropriate wiring.
Step 6: Install the Inverter
Once the panel is connected to the inverter, it's time to install it. This includes securing the inverter in place and integrating it into your electrical system, such as the grid.
Step 7: Test to Assess Performance
Once solar panels and inverters are installed, a test will be performed to analyze the operation. Turing on the system and checking to ensure it produces electricity as estimated. If everything is properly working, then you can start using it.
Remember, installing a solar inverter is a complex process that requires familiarity with solar systems and electricity. It's crucial to follow the steps carefully to ensure the installation is successful. While DIY solar installation can save you money, if you need more confidence about it, seek professional help before it's too late.
Professional Solar Inverter Installation vs. DIY Solar System Installation
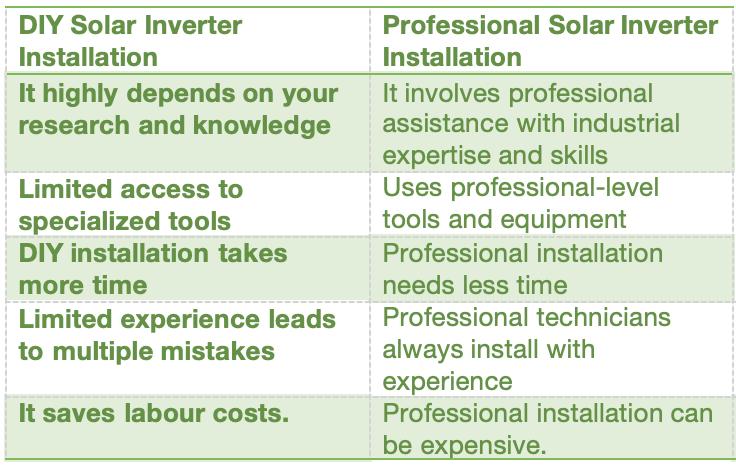
DIY is budget-friendly, while professional installation requires additional labor. Professional installation offers reliability, while DIY installation depends on your knowledge and skill. So, which one is best?
Let’s go through a comparison table;
Expert Advice for Installing Solar Inverter
Here we spent a long time discussing DIY installation of solar inverters, but here, Innotinum (a leading manufacturing company of energy storage solutions like lithium-ion batteries and solar inverters) offers some expert advice;
- Always prioritize safety throughout the installation process.
- Choose the appropriate solar inverter to optimize energy production. Contact Innotinum for the finest inverters that meet your energy requirements.
- Ensure you have all supporting equipment and gear for any rapid shutdown.
- Always follow all the manufacturer's guidelines and instructions when installing solar systems.
- Choose the correct location for installation.
- Seek professional help by contacting Innotinum at any time of the day. They will offer expert help and address some of your queries.
Now that you know everything related to the DIY Installation of solar inverters go for it.


